Showing posts with label DIY/Cleaning. Show all posts

Saturday, September 22, 2012

DIY Body wash…kinda

So again I am trying something I saw on Pintrest…weird I know.  I am always looking for ways to save a few dollars here and there and I love me some Dove body wash but I have a REALLY hard time paying $6-$7 for a bottle.  Granted it lasts me about 2 months, but still.  So one night while I was looking on Pintrest as I way trying to fall asleep (yep, I’m a multi-tasker like that) I saw “Make your own body wash”.  I pinned it on my Cleaning/DIY board and figured I would take a peek at it in the morning. 
She costed it out using a 6 pack of Dove bar soap and it came out to $1.72 for 24 oz bottle.  Now this is our in Utah so of course I knew it would be a little bit more here so I decided to go hunting for Dove bar soap.  First stop (should’ve been my only) was Big Lots.  I found a 2 pack of soap for $2 (well 2.16 with tax)!!!!
DSCN0241
She originally used 3 bars to 6 cups of water so for mine I cut it down to 4 cups for the 2 bars.  I started to heat up the water on medium heat so that the soap would melt instead of just floating when I put it in. 
While the water was heating up, I started grating the soap with my cheese grater.  I mean its soap so it will wash off, just make sure that it is really clean before I go using it for my cheese on nachos, lol.
DSCN0242
Once it was all grated (I used the fine part when the bar got really small and I was afraid I was going to leave a part of my finger in the soap) I put it into the water and started stirring until it was all melted, about 5-7 minutes. ***Side note:  She also made another batch using her microwave to “break down” the soap, right here***
DSCN0243
Once it was completely melted I transferred it to a glass bowl.  she says it takes about 24 hours for it to thicken up so I have to wait until tomorrow to see what it ACTUALLY looks like, but right now it looks like I have a big bowl of milk sitting on my counter
DSCN0244


I'm a BIG clutz so I poured it into the old bottle of body wash I had over the sink.  Good thing too because right after I snapped this pic, I moved my hand a little bit and it started pouring down the back of the bottle.  It was still a little bit runny but it should continue to thincken up.  but even still, it had the consistancy of body wash!
 

So what is the final cost on this?  I basically made 1.5 bottles (1 bottle is 24oz) for $2! That is a savings of about $4, even with the Target brand of Sensitive skin body wash.  Granted it is not a HUGE savings but right now with everyone saving money and pinching pennies, it’s a savings Smile

Saturday, July 7, 2012

Save money on laundry?????

***WARNING***Today there are some every embarrassing pictures on here, so in advance…I’m sorry.
Laundry, the one chore we all have to do, and the one we hate the most
54324739225230410_aHWeF14l_c
And it can be so expensive!  Why should I pay good hard earned money for something I hate to do!  And even more since I have to go to the community laundry room in my complex. I mean this week at Target you can get a 150oz liquid or 102 load powder or 62 count Boost Duo Pacs ON SALE for $17.99 or 100oz liquid from Wal-mart for $11.97.  Sounds like a great deal right?  Well if you go to the Tide website it breaks down how many loads you get for the liquid.  150oz is 90 loads and the 100oz is only 60 loads!  Don’t even get me started with stain removers!  I have tried Shout, OxyClean and even the new Tide one (yes I used to be a Tide girl.  Keyword…USED).  Nothing ever got the stain out 100%.  Money down the drain Sad smile, literally.
Well I found a few different sites that showed how to make my own laundry soap and stain remover for seriously pennies or even better FREE with items I had around the house!
DIY Stain Remover
Adapted from Once Good Thing By Jillee
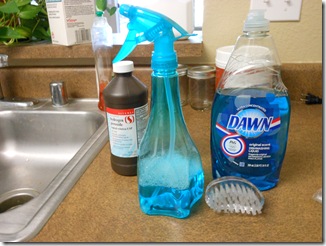
What you need:
Hydrogen Peroxide (have it around the house already don’t you. See…FREE! My favorite 4-letter word)
Dawn Dish Soap (have it (fav. word), or swing by the store and grab some for $2-$3 and still wash your dishes)
Spray bottle (either have 1 laying around the house (fav. word again!) or grab one at the 0.99 store or I got mine at Big Lots for a buck I think)
DSCN0208
The ratio of peroxide to Dawn is 2:1.  I had the peroxide already so I measured that out and found I had 1.2 cups left in the bottle so I just divided 1.5 in half and that gave me a total of 3/4 cup of Dawn.  Or better yet 2 cups of peroxide to 1 cup Dawn Smile
Swirl the mixture around and you have the best stain remover!  Spray on the area that you want to remove the stain, scrub with a brush (I used a nail brush I had laying around or you could use an old toothbrush) and let it sit for awhile  The blog I found this on she said to let it sit for an hour.  I only let mine sit for about 20 minutes while I sprayed it on all of my whites.  I wanted to try to get rid of those nasty (!!!!) armpit stains that have been on my white tank tops for a long time (some even a year or so).  I had tried ever thing out there to remove the stains and seriously it got rid of some of it, but the yellowing was still there.  Here is the proof that this stuff works.  Again this is embarrassing
                                  DSCN0152
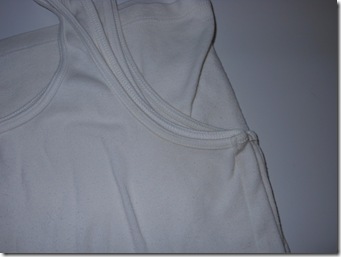
This is before!  Thank goodness I would ONLY wear this under other shirts so no one would ever see this disgusting stain!
And drumroll please…da-da-da-da-da-da-da-da-da-da-da (yep that’s my drumroll on the keyboard)
DSCN0153


LOOK AT THAT!!!!! I swear this is the same tank top!!!!!  I used it on all of my white tank tops, sports bras and even socks.  All clean and white!!!!  And what did it cost me? $3.47! $1.00 for the bottle, $2.47 for the Dawn and nothing for the peroxide!  I found on the Wal-mart site that Tide Stain remover is $3.97, but that product 1) can only be used for one thing and 2) I have found does not work as well.  I will NEVER buy another clothing stain remover ever again!
DIY Laundry detergent
Adapted from Being Creative to Keep My Sanity
So as you saw that the beginning the cost and amount of loads of detergent you get for your money for $17.99 you can get 102 loads of laundry (we will compare powders since that is what I make).  If you cost it out that is 0.17/load.  Not that bad you think.  But what is I told you for $20 you could easily make 2 gallons of laundry detergent and it will work just as good and you will not be paying for all the chemicals that are in name brand detergent?
Here is what you need (prices are current, not from when I originally bought the items):
IMG_2866
One 4lb box of Borax (I found mine at Smart & Final for $3.99)
One 4lb box of Baking Soda (again Smart & Final for $3.29)
One box of Super Washing Soda (I couldn’t find it at ANY store here so I ordered on Amazon for $8.72 or I found a site where it shows you how to make your own out of baking soda here)
3 bars of Fels-Naptha soap or 2 bars of Zote soap (the Zote is cheaper at $0.99/bar where the Fels-Naptha was $1.49 at Stater Bros)
2 small containers of Oxy Clean or store brand Oxy Clean (I got the small Stater Bros. kind when I first made this, but I could not find them today.  The 3.5lb container today was $4.99)
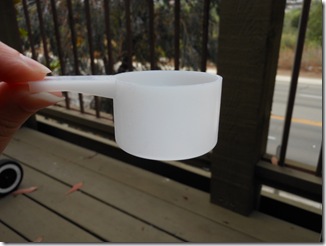
Ok so before we go any further lets add this all up.  The total for the ingredients (4-5 total) is $17.98! ( I did not add the Oxy Clean since like I said I got the smaller containers and could not get a current price on it) That is the same as the 102 load of Tide, but lets cost it out.  The total weight of everything (minus the Oxy) is 220.24oz and the site says to use 1-2 tablespoons, which is 0.5oz (I used the scoop that came with the OXY and I just measured it out and its 1 tablespoon) so take 220.24 (amount made) and divide that by 0.5 (amount used) you get 440.48 uses.  You see that!!! 440 USES!!!!!!! And cost that out 17.98/440 is $0.04! 4 pennies for a single load of laundry!  Not only is it a 0.13 savings per load but that’s 4 containers of the detergent which is $17.99 (on sale remind you) times 4 is $71.96 compared to $17.98 Smile
Ok so now onto the fun part, making it:
Grate the Zote soap with a cheese grater.  I used the super fine side so that it would break up easier in the washing machine
IMG_2869
Line a 5 gallon bucket with a trash bag and I started layering the items and mixing with my hands.  So the box of baking soda and then 1 bar of soap, mix. Add the Borax and another bar of soap and mix again. Repeat with the remaining ingredients.
This is what it looks like finished:
DSCN0203
Not the best picture but you can see the pink Zote soap in there.  I use the baking soda container for when I go to the laundry room and have hardly put a dent in it even though it looks like half empty, it wasn’t filled all the way and I have given away quite a lot to friends and family.
DSCN0204
And my trusty scoop Smile
DSCN0205
The soap is safe on HE machines as it is a low sudsing product.  And don’t let the lack of bubbles freak you out if you open the washing machine.  It will still get super clean, I promise Winking smile
So, now that you’ve read all of this are you ready to save money and get super clean clothes? Of course you are!  Now if there was just a product that would fold and put the clothes away!

Sunday, June 3, 2012

DIY Foaming Soap

Over the past few months I have been trying to find way to cut corners and save some money.  When It came time for me to refill my soap dispensers I went to the store to buy the “Foaming” soap refills.  I took a look at the cost of a small one and thought there HAS  to be a way to make my own. Well thank goodness for The Frugal Girls!  They have so many great ideas for saving some dinero Smile

I found the DIY Foaming Soap recipe and remembered that when I moved I had a HUGE container of regular Dial hand soap that I bought like 5 years ago at Costco.  I stopped using it when I fell in love with foaming soap, so full circle, it is getting much love again and I get the product I love!

Here ya go:

What you need:

  • Liquid soap (any kind works)
  • Empty Foaming Soap bottle AND the dispenser.  That is what “froths” up the soap

                 DSCN0146

Add 1 inch of liquid soap to dispenser

                            DSCN0148

Fill up dispenser to the “Fill Line” slowly with water (if you add it too quickly, it’ll just bubble up

Now…the tricky part.  DO NOT SHAKE BOTTLE!!!! You need to invert it slowly about 5-6 times until it is mixed

                                   DSCN0149

As much as you might want to shake the bottle it will just get all foamy and will not mix the soap and water.

TA-DA!!!!! You have your fancy Foaming Soap that works just as well as the refill kind you buy and for this batch (and until the huge bottle is gone) it didn’t cost me a single penny!

             DSCN0150

Sunday, November 27, 2011

My new cleaning friend

Ok so I’ve become addicted (yes…ADDICTED) to Pintrest!  It is the most awesome website in the world!  It is a bunch of people posting anything and everything from the internet! (can you tell how excited I am from all the exclamation points?)
Anywho, I came across a picture of a lady scrubbing the carpet and I clicked on the picture, which took me to her blog where she explained that she used baking soda and some essential oils to remove the smell of her sons vomit from the carpet, even though she had cleaned it well, or so she thought.  That got me to thinking.  Hunny has made some messes in the apartment and when you lay down on the carpet you can still smell the odor of urine.  I decided to type in the search of “carpet cleaners” and there was a video explaining that sprinkling just plain baking soda and just letting it sit for a period of time if would 1) absorb any smells (I mean we put it in the fridge to absorb any smells in there) and 2) absorb any oils/grease that may be in the carpet! I decided to try it out in my bedroom since that seems to be Hunny’s favorite place to “leave me presents”.  I vacuumed first to get any loose hair and debris and then sprinkled the soda and let it sit for about an hour, then vacuumed it up.  I decided to do the smell test for myself and sure as s#!t the smell was COMPLETELY GONE!!!  I then used it all over the apartment and the carpets feel softer and cleaner since the body oils are now all gone!
This got me now intrigued with baking soda.  What else could I do with it?  I searched “baking soda cleaners” and low and behold good old Martha Stewart has a bath tub cleaner where you use just baking soda, a teaspoon of dish soap, and an antibacterial essential oil (I just used the soap since it’s soap.  I mean we wash dishes with it. It’s gotta get rid of bacteria, right?)  You add enough water to create a paste and you are good to go.  Holy cow!  This is the best scrub ever!!! 1) no chemical smells that knock you out!  Also, you don’t have to take everything out because of the cleaning chemicals getting on the loofa, razors or anything else. 2) it takes a little bit more elbow grease, but it works wonders! I have a textured floors in the shower and I could never get it completely clean.  This took care of it and my shower looks brand new.  3) It works just as well as on the fixtures in the shower as well.  Its almost like a soft scrub. I also used it on my sink in the kitchen since its stainless steel and its worked great!
Oh and 1 more great thing baking soda is great for is…DRAIN-O! Remember as a kid you would combine vinegar and baking soda and a volcano would be the result?  Well…think of that in your pipes!  I used it in my bathroom sink and the pipes run nice and clear without the harsh chemical smell or the worries of it getting on your skin.  I also used it in the kitchen to clean the drain before running the dishwasher.  No more funky smell Smile
Well there you go.  My new love arm-hammer-baking-soda